Microsoft is providing ISO images of the Windows 8 Consumer customer
Preview software shown at the BUILD key note. Read this post to learn how to install Windows 8 on VMWare Workstation.

Step 1:
Download Windows 8 :
- Main site : http://windows.microsoft.com/en-US/windows-8/consumer-preview
- Download the 64-bit Version : http://iso.esd.microsoft.com/WCPDL/BD1B8A49393E30CC9C4E5C88457D73E964F1F3B18/Windows8-ConsumerPreview-64bit-English.iso
- Download the 32-bit Version : http://iso.esd.microsoft.com/WCPDL/BD1B8A49393E30CC9C4E5C88457D73E964F1F3B18/Windows8-ConsumerPreview-32bit-English.iso
Step 2:
Install VMWare Workstation
[1] Launch VMWare Workstation. You can find the shortcut to launch VMWare Workstation on your desktop or start menu.. Click "Create a New Virtual Machine", and a new window will pop up

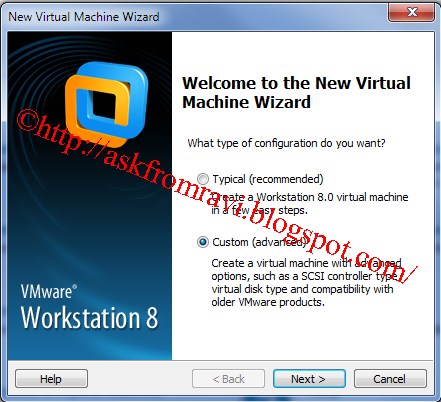
[2] Choose custom, Click Next.
[3] Guest Operating System Installation. - Here you are expected to
provide a source for your Operating System installation, so this would
be either a CD/DVD or ISO image.VMware does not recognise the developer preview of Windows 8 yet,
however. To avoid possible problems with Setup, here we are going to
choose the third option; "I will install the Operating System later." Click Next.

[4] Select a Guest Operating System.
To automate certain things, VMware asks you to select which Guest Operating System you want to Install. Select "Microsoft Windows", and for the Version, select "Windows 7" if installing the x86 / 32-bit version of the Windows 8 Developer Preview, or "Windows 7 x64" if installing the x64 / 64-bit version of the Windows 8 Developer Preview. Click Next.

[5] Name the Virtual Machine / Provide Location. - You can name your Virtual Machine anything you want, since the name only matters to VMware anyway, Click Next.

[6] Hardware - Processors. - If you have a single-core processor, you
can leave the number of processors at 1, and number of cores at 1. If
you have a dual-core processor, as we do on the test system, then set "Number of cores per processor," to 2. Click Next.

[7] Hardware - Memory. - The next thing you need to do is specify
some hardware settings for your Virtual Machine. For memory, you will
need to set at least 1GB (1024MB) for the x86 installation, or 2GB (2048MB) for the x64 installation. Click Next.

[8] Leave the followings as it is


[9] Specify Disk Capacity. - VMware will suggest 60GB for Windows 7.
You do not need that much just to test out the Developer copy of Windows
8. We choose 30GB, but 20GB will be just fine.
NOTE: This does not mean 20GB hard disk space will be used up immediately. This is the maximum amount
of storage space the Guest OS is allowed to use on your hard drive.
Even though you might set it to 20GB, only around 6-7GB will actually be
used up upon installation. What you specify here is just the maximum
space it can utilize.

[10] Hardware - CD/DVD/ISO
If we were to boot your Virtual Machine now, it would have nothing to do, it would just stop at "Operating System Not Found," so we need to specify some media to boot from.
Under Connection, select "Use ISO image file". Click Browse,
and navigate to the directory where you saved the ISO image containing
the Windows 8 concumer Preview installation. Double click the ISO file
when you find it to select it.
Now when you power on your Virtual Machine, that ISO image will be
mounted to a virtual CD/DVD drive, and once the VM finds nothing on the
virtual hard drive, it will proceed to boot from the virtual CD/DVD
drive instead.

Click Close.
[11] Power on your Virtual Machine.
You will now see your Virtual Machine, powered Off, in VMware Workstation. Click "Power on this Virtual Machine" and wait for the installation to commence.
Additional :
Additional :
- Double click inside Virtual Machine, tap CTRL + ALT + ENTER to go Full Screen mode.
- CTRL + G allows you to input data directly to VM.
- CTRL + ALT + ENTER also exits full screen.
- To unlock your Keyboard / Mouse from VM, hold CTRL + ALT outside of Full Screen.
Windows 8 cp installations Install Windows 8 Consumer preview in VMware Workstation part II
No comments:
Post a Comment